
R&G Tail Tidy
+7
SuzySuzuki
madmax
paul
Hammy
kewwig
NZspokes
Cameron
11 posters
Page 2 of 2
Page 2 of 2 •  1, 2
1, 2
R&G Tail Tidy
![]() Cameron Sat 20 Oct 2012, 6:23 pm
Cameron Sat 20 Oct 2012, 6:23 pm
First topic message reminder :
Sorry for the delay, but here is the write up on the R&G tail tidy.
Very simple installation.
Basically bolt off, bolt on.
1. Remove the seat, remove the battery and unbolt and remove the tail piece and tail light.

2. Unplug wiring and remove rear fender. A couple of screws just above the indicators and a couple of bolts under where the battery sits and the whole piece will lift out.

3. Remove the indicators from the hold tail piece and install them to the new number plate bracket. I believe a 10mm nut holds them on.

4. Screw the new number plate bracket to the new fender. The new fender is very good quality for an aftermarket copy. Its equally good, if not better than the original one.


5. Fit the new LED number plate light and reinstall the fender. It fits back in exactly the same as the old one.

6. Fit the tail piece, tail light battery and seat all back together. Fit your number plate, check all the lights work and away you go.

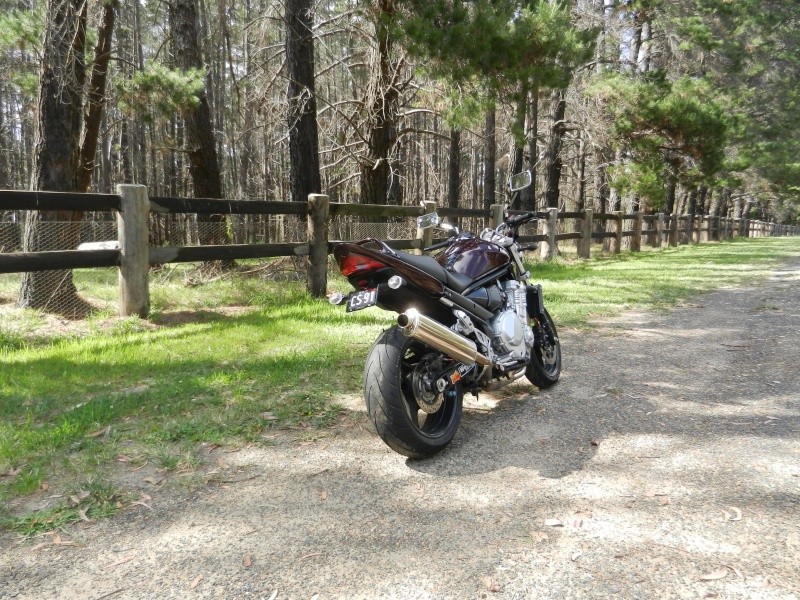
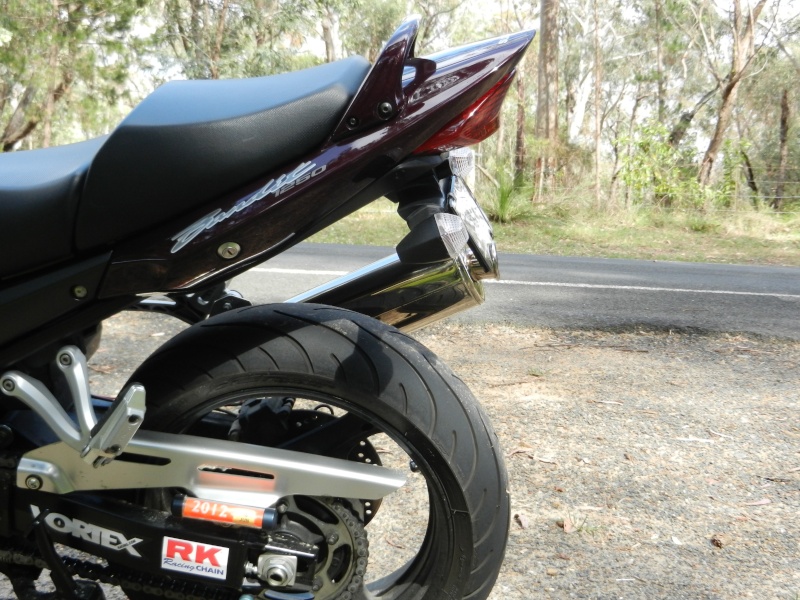
I am very happy with this product. All new panels line up perfectly. There is no cutting, drilling, soldering required of the original parts. New wiring plugs straight into the old loom. And the quality is fantastic. Its probably the best tail tidy i have seen on a bandit.
The kit comes with full detailed instruction, plenty of cable ties. Plenty of heat shrink to tidy up the wiring if you want to.
The only negative things i found with the install:
- One of the fuse holder mounts is missing, so it just floats there. Doesnt worry me, i just cable tied it out of the way.
- There is no mount for the tool bag. In the original unit, there are lugs with a large rubber band to hold down the bag. In the R&G product, there is nothing there. Again, this didnt worry me, i squashed it in there with a puncture repair kit, and it doesnt move.
All in all very happy with the R&G tail tidy. Definately recommend to everybody that wants to clean up the rear of the bike.
Score 8/10
Sorry for the delay, but here is the write up on the R&G tail tidy.
Very simple installation.
Basically bolt off, bolt on.
1. Remove the seat, remove the battery and unbolt and remove the tail piece and tail light.
2. Unplug wiring and remove rear fender. A couple of screws just above the indicators and a couple of bolts under where the battery sits and the whole piece will lift out.
3. Remove the indicators from the hold tail piece and install them to the new number plate bracket. I believe a 10mm nut holds them on.
4. Screw the new number plate bracket to the new fender. The new fender is very good quality for an aftermarket copy. Its equally good, if not better than the original one.
5. Fit the new LED number plate light and reinstall the fender. It fits back in exactly the same as the old one.
6. Fit the tail piece, tail light battery and seat all back together. Fit your number plate, check all the lights work and away you go.
I am very happy with this product. All new panels line up perfectly. There is no cutting, drilling, soldering required of the original parts. New wiring plugs straight into the old loom. And the quality is fantastic. Its probably the best tail tidy i have seen on a bandit.
The kit comes with full detailed instruction, plenty of cable ties. Plenty of heat shrink to tidy up the wiring if you want to.
The only negative things i found with the install:
- One of the fuse holder mounts is missing, so it just floats there. Doesnt worry me, i just cable tied it out of the way.
- There is no mount for the tool bag. In the original unit, there are lugs with a large rubber band to hold down the bag. In the R&G product, there is nothing there. Again, this didnt worry me, i squashed it in there with a puncture repair kit, and it doesnt move.
All in all very happy with the R&G tail tidy. Definately recommend to everybody that wants to clean up the rear of the bike.
Score 8/10
_________________
<<Real men ride naked>>

Cameron- Admin
- Posts : 1674
Join date : 2009-08-19
Age : 33
Location : Penrith
Re: R&G Tail Tidy
![]() Re-Cycled Sun 04 Nov 2012, 8:24 pm
Re-Cycled Sun 04 Nov 2012, 8:24 pm
Cameron wrote:Sorry gus, i like the blinkers. I hate small blinkers. i really do.
Nothing wrong with that, I like blinkers people can actually see.
However they may look better if you could angle them so they point horizontally (don't worry I cant stand crooked paintings either).
_________________
Cheers Peter
2007 DL1000 V Strom
Re-Cycled- Posts : 2227
Join date : 2009-08-20
Age : 65
Location : Newcastle -

Page 2 of 2 • 1, 2
» R&G Tail Tidy
» 96 tail tidy
» Evotech Tail Tidy
» R&G tail tidy 1250s bandit
» Options on Fender Eliminators, Tidy Tails & Undertails
» 96 tail tidy
» Evotech Tail Tidy
» R&G tail tidy 1250s bandit
» Options on Fender Eliminators, Tidy Tails & Undertails
Page 2 of 2
Permissions in this forum:
You cannot reply to topics in this forum|
|
|