
Spark Plugs - How to.......
+6
kewwig
reddog
Re-Cycled
Ewok1958
Bosco15
sb1250
10 posters
Page 1 of 1

Spark Plugs - How to.......
![]() sb1250 Sat 01 Feb 2014, 11:18 pm
sb1250 Sat 01 Feb 2014, 11:18 pm
I thought I'd post a "how to" for those who are willing to do a bit of spannering on their Bandit, but unsure what to do, or where to start. I'm not a mechanic, but this is how I did it........
Well, 48600kms isn't bad on the original spark plugs!! So after a trip to the bike shop to pick up a new set of NGK CR7E's at $4.70 each, it was time to put them in. The fuel gauge was flashing, so I knew their wasn't much premium left in the tank. Something to consider because you will be removing the tank completely from the Bandit. Now tools......I used the Bandits tool kit, a feeler gauge, basic metric socket set with an extension bar, and my new ratchet spanners. Make sure you have some rags handy. You may want to check the gaps of the new plugs using a feeler gauge before they go in (0.7mm-0.8mm).

Take the seat off. Undo the 2 bolts holding the petrol down.
Lift the rear of the tank up, and while supporting the front of the tank, move the tank rearward and up. Now you'll need to chock the tank up so the pipes and wires can be undone. Remove the 2 rubber hoses at the rear first. They should pull off. Next is the electrical connector.

Push the clip down and wriggle it about. It will be a bit of a bastard if it hasn't been undone before! Last is the fuel line.

Pinch the blue tabs together, push the connector in a fraction, then pull off. There might be a small squirt of fuel if the bike has been recently ridden. Now I tucked the fuel line between the throttle cables so any fuel still in the line wouldn't spill.

Find somewhere safe to place the tank.
Now you can see your airbox, radiator cap, and the tops of the ignition coils. Undo the connector on the first ignition coil.

Now, I got my compressor out and gave the area around the coil a good blast, just to make sure no dirt/debris fall into the top of the motor. The next bit gives your fingers a bit of a work out!! You need to pull the coil straight up and out. This was the hardest part of the whole job. I did squirt some wd-40 down the side of the coil, just to help with freeing up the seal.


Use the longer plug socket, and slide it into the hole and push firmly over the old spark plug.
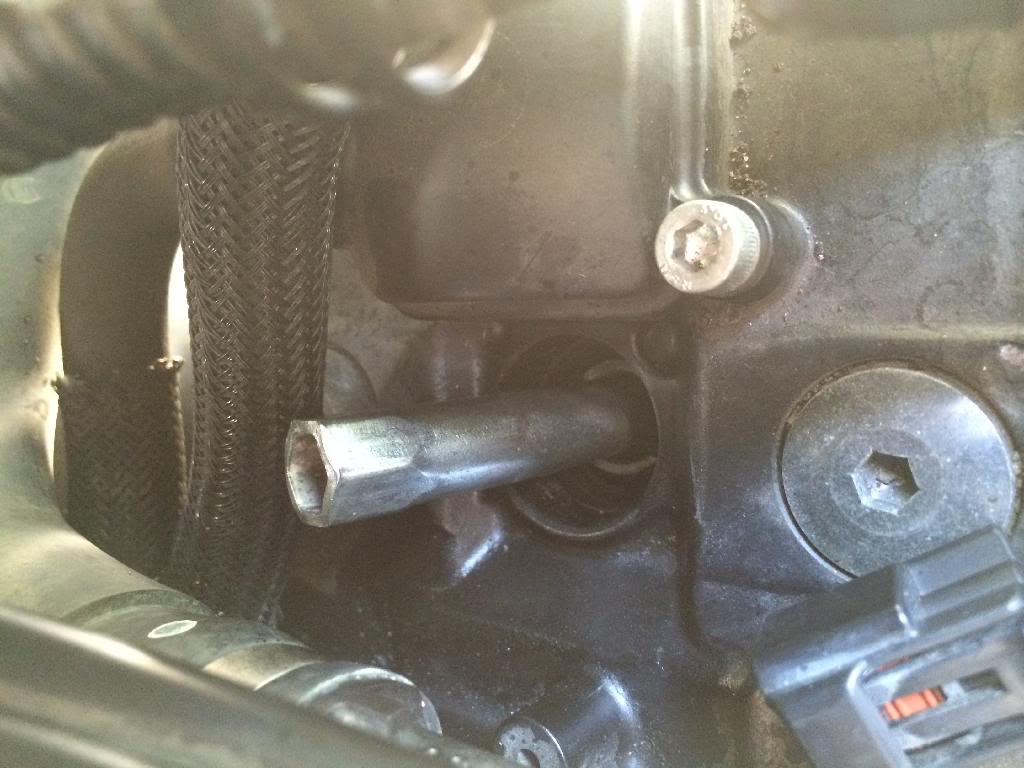
I used a spanner on the top of the plug socket to undo a few turns, then used my fingers to undo the rest. The plug socket and old plug should just pull out with a bit of manoeuvring. Take the old plug from the plug socket, and replace it with a new one. Slide the new plug and socket into the hole in the cylinder head, and do it up finger tight with your fingers. Place a spanner back onto the plug socket and tighten 1/2 turn.
Slide the ignition coil back down the hole and push down as hard as you can until you feel/hear clicks. Push the connector back onto the coil and you're done! One down......3 to go.
Now, a few things to mention. I didn't remove any body work coz my Bandit is the fast black S (half fairing 1250s!!), and I put the tank back on after each new plug. A bit anal perhaps, but I wanted to make sure the plug I'd just put in actually worked! If it didn't, I knew it was the last one I'd put in! I undid the radiator cap housing to gain access to the plug underneath.
We'll, that's it. A bit of a long winded description, but it may help you. If not, I've at least taught myself to take pics, upload them to photobucket, and post em on here.....all from a bloody fruit phone!! That was harder than changing the plugs!!
Well, 48600kms isn't bad on the original spark plugs!! So after a trip to the bike shop to pick up a new set of NGK CR7E's at $4.70 each, it was time to put them in. The fuel gauge was flashing, so I knew their wasn't much premium left in the tank. Something to consider because you will be removing the tank completely from the Bandit. Now tools......I used the Bandits tool kit, a feeler gauge, basic metric socket set with an extension bar, and my new ratchet spanners. Make sure you have some rags handy. You may want to check the gaps of the new plugs using a feeler gauge before they go in (0.7mm-0.8mm).
Take the seat off. Undo the 2 bolts holding the petrol down.
Lift the rear of the tank up, and while supporting the front of the tank, move the tank rearward and up. Now you'll need to chock the tank up so the pipes and wires can be undone. Remove the 2 rubber hoses at the rear first. They should pull off. Next is the electrical connector.
Push the clip down and wriggle it about. It will be a bit of a bastard if it hasn't been undone before! Last is the fuel line.
Pinch the blue tabs together, push the connector in a fraction, then pull off. There might be a small squirt of fuel if the bike has been recently ridden. Now I tucked the fuel line between the throttle cables so any fuel still in the line wouldn't spill.
Find somewhere safe to place the tank.
Now you can see your airbox, radiator cap, and the tops of the ignition coils. Undo the connector on the first ignition coil.
Now, I got my compressor out and gave the area around the coil a good blast, just to make sure no dirt/debris fall into the top of the motor. The next bit gives your fingers a bit of a work out!! You need to pull the coil straight up and out. This was the hardest part of the whole job. I did squirt some wd-40 down the side of the coil, just to help with freeing up the seal.
Use the longer plug socket, and slide it into the hole and push firmly over the old spark plug.
I used a spanner on the top of the plug socket to undo a few turns, then used my fingers to undo the rest. The plug socket and old plug should just pull out with a bit of manoeuvring. Take the old plug from the plug socket, and replace it with a new one. Slide the new plug and socket into the hole in the cylinder head, and do it up finger tight with your fingers. Place a spanner back onto the plug socket and tighten 1/2 turn.
Slide the ignition coil back down the hole and push down as hard as you can until you feel/hear clicks. Push the connector back onto the coil and you're done! One down......3 to go.
Now, a few things to mention. I didn't remove any body work coz my Bandit is the fast black S (half fairing 1250s!!), and I put the tank back on after each new plug. A bit anal perhaps, but I wanted to make sure the plug I'd just put in actually worked! If it didn't, I knew it was the last one I'd put in! I undid the radiator cap housing to gain access to the plug underneath.
We'll, that's it. A bit of a long winded description, but it may help you. If not, I've at least taught myself to take pics, upload them to photobucket, and post em on here.....all from a bloody fruit phone!! That was harder than changing the plugs!!
_________________
_________________________________________________
SOLD....
2010 Suzuki Bandit 1250s - Love the colour ......matches my eyes!
Mods included...
Home made rad guard
IXIL muffler
Pro-oiler
stebel nautilus compact horn
Xenon 55w 4300k HID (low beam only)
Ventura Rack
Did have Bandit Mania "Chin" spoiler (belly pan) RIP...
Barkbuster Storm hand guards
Removed rubber dampers from tool kit area - Gus' idea

sb1250- Posts : 586
Join date : 2011-07-11
Age : 53
Location : Greensborough, Victoria
Re: Spark Plugs - How to.......
![]() Bosco15 Sun 02 Feb 2014, 7:26 am
Bosco15 Sun 02 Feb 2014, 7:26 am
Nice write up, Sb.
Good to be able to do your own work on your bike and help others along the way.
Just one quick note on the fuel line connection. Be sure that you have seated it correctly and all the way home, give it a good test wiggle. A few guys have reported experiences of their line coming adrift whilst riding and squirting fuel around.
Keep up the good work, mate.
_________________
Some people are like slinkys. Not good for anything but they make you smile when you push them down the stairs.

Bosco15- Posts : 1359
Join date : 2013-12-04
Age : 54
Location : Newcastle
Re: Spark Plugs - How to.......
![]() Ewok1958 Sun 02 Feb 2014, 7:56 am
Ewok1958 Sun 02 Feb 2014, 7:56 am
Nice one sb. That bit about blowing the crap out of the plug cavities is important. Or you can make yourself a vacuum cleaner attachment with a piece of small diameter flexible plastic tube so you can suck any crap up after you've pulled the coils out and before the plugs are removed.

Ewok1958- Posts : 3940
Join date : 2010-08-03
Age : 65
Location : Bega, NSW
Re: Spark Plugs - How to.......
![]() Re-Cycled Sun 02 Feb 2014, 8:20 am
Re-Cycled Sun 02 Feb 2014, 8:20 am
That should help a lot of people who haven't done this sort of thing before.
I'd just like to add this tip from a Haynes manual, I use a piece of semi rigid plastic tube about 100mm long (it came on the top a a 1 litre gear oil bottle) it really gives you a better feel when reinserting the plug.

I'd just like to add this tip from a Haynes manual, I use a piece of semi rigid plastic tube about 100mm long (it came on the top a a 1 litre gear oil bottle) it really gives you a better feel when reinserting the plug.
_________________
Cheers Peter
2007 DL1000 V Strom
Re-Cycled- Posts : 2227
Join date : 2009-08-20
Age : 65
Location : Newcastle -

Re: Spark Plugs - How to.......
![]() reddog Sun 02 Feb 2014, 11:51 am
reddog Sun 02 Feb 2014, 11:51 am
Another trick is to use about 100mm of injector hose over the nipple of the spark plug when removing, replacing and finger tightening. Works a treat and saves having to find a pair of Japanese fingers 
If you are not sure what I mean I can take a photo and post it up.
If you are not sure what I mean I can take a photo and post it up.

reddog- Posts : 2523
Join date : 2010-09-27
Age : 46
Location : Allanson WA
Re: Spark Plugs - How to.......
![]() sb1250 Sun 02 Feb 2014, 1:34 pm
sb1250 Sun 02 Feb 2014, 1:34 pm
The spark plug sockets in the Bandits tool kit have an internal rubber bush with the right hole size for the threaded end of the plug. I like the hose option......good to know.
Having Japanese fingers that can "curl" about 20 kgs would be handy!! Especially for removing the ignition coil behind the radiator cap housing.
The old plugs were only slightly out of spec. I checked them before chucking them away.
Having Japanese fingers that can "curl" about 20 kgs would be handy!! Especially for removing the ignition coil behind the radiator cap housing.
The old plugs were only slightly out of spec. I checked them before chucking them away.
_________________
_________________________________________________
SOLD....
2010 Suzuki Bandit 1250s - Love the colour ......matches my eyes!
Mods included...
Home made rad guard
IXIL muffler
Pro-oiler
stebel nautilus compact horn
Xenon 55w 4300k HID (low beam only)
Ventura Rack
Did have Bandit Mania "Chin" spoiler (belly pan) RIP...
Barkbuster Storm hand guards
Removed rubber dampers from tool kit area - Gus' idea
sb1250- Posts : 586
Join date : 2011-07-11
Age : 53
Location : Greensborough, Victoria
Re: Spark Plugs - How to.......
![]() kewwig Sun 02 Feb 2014, 3:51 pm
kewwig Sun 02 Feb 2014, 3:51 pm
I put a smear of copper grease on the threads to prevent seizure of the plug in the head. I use a 14mm socket on one of those jointed adapters and extension onto the plug tool to torque the middle two plugs, and straight onthe plug tool on the two outer plugs. I have always been paranoid about stripping the head

kewwig- Posts : 985
Join date : 2011-03-21
Re: Spark Plugs - How to.......
![]() reddog Sun 02 Feb 2014, 5:05 pm
reddog Sun 02 Feb 2014, 5:05 pm
I just do it until my elbow clicks. They normally have crush washers so you don't need to over do it that's for sure
reddog- Posts : 2523
Join date : 2010-09-27
Age : 46
Location : Allanson WA

gus- Posts : 6176
Join date : 2010-11-23
Age : 73
Location : Cygnet ,Tasmania
Re: Spark Plugs - How to.......
![]() Boatz Sun 02 Feb 2014, 6:17 pm
Boatz Sun 02 Feb 2014, 6:17 pm
Good report SB, Maybe Cameron can add a "How To Section" on here. There are a few good How To's already here that can go in it. Will save time searching the whole forum for a tip.
_________________
2010 GSX1250FA
Maintenance Tip " IT'S NOT RIGHT TILL ALL THE BOLTS ARE TIGHT"

Boatz- Posts : 405
Join date : 2011-03-09
Age : 63
Location : The Gong
Re: Spark Plugs - How to.......
![]() Kaupy1962 Mon 03 Feb 2014, 11:43 pm
Kaupy1962 Mon 03 Feb 2014, 11:43 pm
I run CR8ea's in mine. Bloody thing runs too hot otherwise.

Kaupy1962- Posts : 1051
Join date : 2011-06-22
Age : 61
Re: Spark Plugs - How to.......
![]() Hammy Tue 04 Feb 2014, 7:03 am
Hammy Tue 04 Feb 2014, 7:03 am
Good tutorial SB1250. I thought I was going to save a few bucks by buying a V Twin. Wrong ! The MT has TWO plugs per cylinder. A lot easier to get at than the Bandit S though.

Hammy- Posts : 4446
Join date : 2011-08-09
Age : 64
Location : The Rock
Re: Spark Plugs - How to.......
![]() Bosco15 Tue 04 Feb 2014, 8:53 am
Bosco15 Tue 04 Feb 2014, 8:53 am
Hammy wrote: I thought I was going to save a few bucks by buying a V Twin. Wrong ! The MT has TWO plugs per cylinder.
That's so the the other plug doesn't feel so alone and scared in those cavernous chambers you call cylinders.
_________________
Some people are like slinkys. Not good for anything but they make you smile when you push them down the stairs.
Bosco15- Posts : 1359
Join date : 2013-12-04
Age : 54
Location : Newcastle
» Spark plugs
» Help reading Spark Plugs
» Changing Spark Plugs
» Plugs that spark and are not tight...
» getting coils and spark plugs out of 2009 bandit
» Help reading Spark Plugs
» Changing Spark Plugs
» Plugs that spark and are not tight...
» getting coils and spark plugs out of 2009 bandit
Page 1 of 1
Permissions in this forum:
You cannot reply to topics in this forum|
|
|